1. What is RoboBinding?
Bind the gap - RoboBinding is a data-binding Presentation Model framework for the Android platform. RoboBinding helps you write UI code that is easier to read, test and maintain.
2. Hello AndroidMVVM(Presentation Model)
An activity based on RoboBinding consists of third parts: layout xml, activity class and presentaton model class. The sample code for the section is from AndroidMVVM.
2.1. Layout
In layout files, we declare RoboBinding namespace, property and event attribute bindings.
activity_main.xml
<LinearLayout xmlns:android="http://schemas.android.com/apk/res/android"
    xmlns:tools="http://schemas.android.com/tools"
    xmlns:bind="http://robobinding.org/android">
    <TextView
        bind:text="{hello}" />
        ...
    <Button
        android:text="Say Hello"
        bind:onClick="sayHello"/>
</LinearLayout>
2.2. Presentation Model(pure POJO)
In presentation models, we declare corresponding properties and methods.
org.robobinding.androidmvvm.PresentationModel.java
@org.robobinding.annotation.PresentationModel
public class PresentationModel implements HasPresentationModelChangeSupport {
    private String name;
    public String getHello() {
        return name + ": hello Android MVVM(Presentation Model)!";
    }
    ...
    public void sayHello() {
        firePropertyChange("hello");
    }
}
2.3. Activity Class
Activities bind layouts and presentation models together with the help of RoboBinding.
org.robobinding.androidmvvm.MainActivity.java
public class MainActivity extends Activity {
    @Override
    protected void onCreate(Bundle savedInstanceState) {
        ...
        PresentationModel presentationModel = new PresentationModel();
        View rootView = Binders.inflateAndBindWithoutPreInitializingViews(this, R.layout.activity_main, presentationModel);
        setContentView(rootView);
    }
}
The simplest AndroidMVVM is done. We use the utility class Binders for simplicity here.
In read-world application development, we recommend using org.robobinding.binder.BinderFactoryBuilder instead.
We can keep the BinderFactory instance in Android application or let a third-party library like RoboGuice manage the BinderFactory instance,
so that we can share and reuse the instance across the whole application.
3. Environment Setup
3.1. Eclipse
Install Eclipse.
3.1.1. Without AspectJ
Add the robobinding-[version]-with-dependencies.jar or robobinding-[version].jar + [google guava]-[11.0.1+].jar to the libs folder of your project, then add it(or them) to classpath by right-clicking on the project→Properties→Java Build Path→Libraries→Add JARs. In Order and Export tab, check the jar(or jars).

3.1.2. With AspectJ
RoboBinding aspects will reduce the work by auto weaving in some source code for us. If we want to take the advantage, firstly get Android Development Tools plugin installed. Once having it installed, right-click on the project→Configure→Convert to AspectJ Project. This will add the AspectJ natures to .project file.
Start by adding either the robobinding-[version]-with-aop-and-dependencies.jar or the robobinding-[version]-with-aop.jar + [google guava]-[11.0.1+].jar to the libs folder of your project, then add it(or them) to classpath by right-clicking on the project→Properties→Java Build Path→Libraries→Add JARs. In Order and Export tab, check it(them).
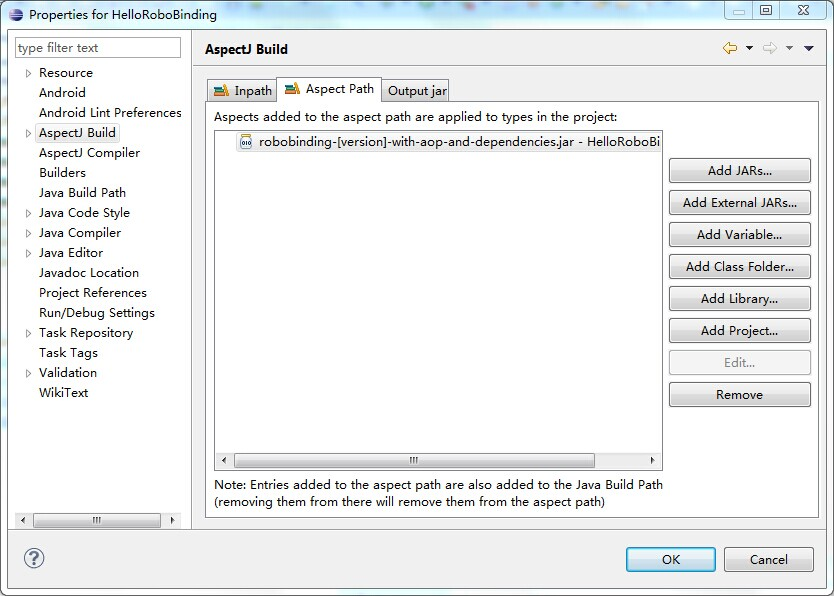
Finally, make sure the RoboBinding jar is added to your project Aspect Path. Right click on your project→Properties→AspectJ Build→Aspect Path→Add JARs.
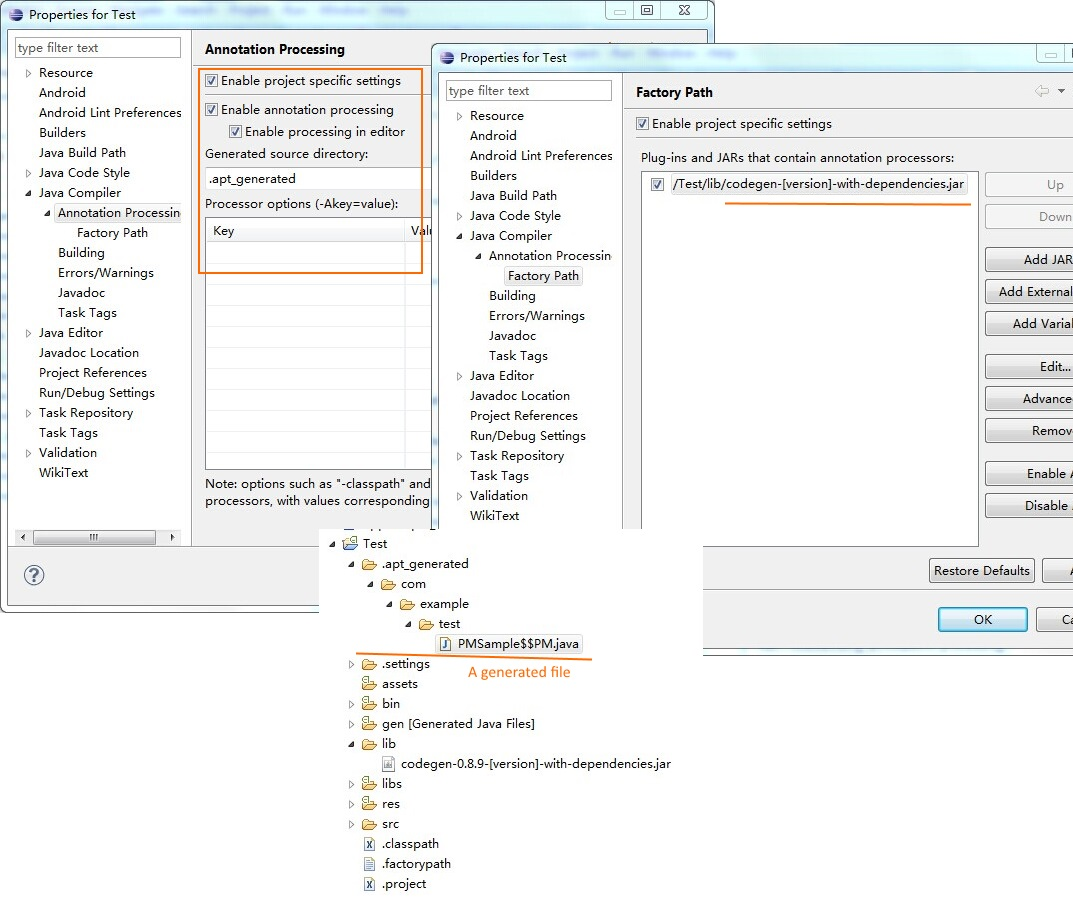
3.1.3. Annotaton Processing Settings
Download RoboBinding codegen-[version]-with-dependencies.jar and update eclipse annotation processing settings as the following picture indicated. codegen-XX.jar is for source code generation only. Projects do not depend on it.
3.2. Android Studio
3.2.1. Without AspectJ
Add robobinding dependencies to gradle.build.
dependencies {
    ...
    compile"org.robobinding:robobinding:${robobindingVersion}"

    //alternatively we can use with-dependencies jar(RoboBinding provide a minimal Proguarded with-dependencies jar.).
    compile("org.robobinding:robobinding:${robobindingVersion}:with-dependencies") {
        exclude group: 'com.google.guava', module: 'guava'
    }
}
Please feel free to refer to the sample projects under RoboBinding, e.g., AndroidMVVM, RoboBinding-album-sample or RoboBinding-gallery.
3.2.2. With AspectJ
Apply RoboBinding Android aspectj plugin in gradle.build.
buildscript {
    repositories {
        ...
        maven() {
            name 'RoboBinding AspectJPlugin Maven Repository'
            url "https://github.com/RoboBinding/RoboBinding-aspectj-plugin/raw/master/mavenRepo"
        }
    }

    dependencies {
        ...
        classpath 'org.robobinding:aspectj-plugin:0.8.+'
    }
}

...
apply plugin: 'org.robobinding.android-aspectj'
Add RoboBinding dependencies to gradle.build.
dependencies {
    ...
    compile "org.robobinding:robobinding:$robobindingVersion"
    aspectPath "org.robobinding:robobinding:$robobindingVersion"

    //alternatively we can use with-aop-and-dependencies jar(RoboBinding provides a minimal Proguarded with-aop-and-dependencies jar.).
    compile ("org.robobinding:robobinding:$robobindingVersion:with-aop-and-dependencies") {
        exclude group: 'com.google.guava', module: 'guava'
    }
    aspectPath ("org.robobinding:robobinding:$robobindingVersion:with-aop-and-dependencies") {
        exclude group: 'com.google.guava', module: 'guava'
    }
}
Please feel free to refer to the sample projects under RoboBinding, e.g., RoboBinding-album-sample or RoboBinding-gallery.
3.2.3. Annotation Processing Settings
Add apt plugin to gradle.build.
buildscript {
    repositories {
        ...
    }

    dependencies {
        ...
        classpath 'com.neenbedankt.gradle.plugins:android-apt:1.+'
    }
}

...
apply plugin: 'com.neenbedankt.android-apt'
3.3. ProGuard
Preserve public methods of PresentationModels as well as the constructors of generated source code. Additionally, we need to preserve all annotations.
To achieve this, add the following directives to your ProGuard configuration:
-keepattributes *Annotation*,Signature
-keep,allowobfuscation @interface org.robobinding.annotation.PresentationModel

-keep @org.robobinding.annotation.PresentationModel class * {
    public *** *(...);
}

-keep class * implements org.robobinding.itempresentationmodel.ItemPresentationModel{
    public *** *(...);
}

-keep class * extends org.robobinding.presentationmodel.AbstractPresentationModelObject{
    public <init>(...);
}

-keep class * extends org.robobinding.presentationmodel.AbstractItemPresentationModelObject{
    public <init>(...);
}
And add the following lines also to keep the constructors of view listeners.
-keepclassmembers class * implements org.robobinding.viewattribute.ViewListeners {
    public <init>(...);
}
And add the following lines to suppress google guava javax.annotation.XX reference warnings.
-dontwarn javax.annotation.**
An example of proguard rules settings can be found in RoboBinding-album-sample under RoboBinding organization.
4. Concepts and Features
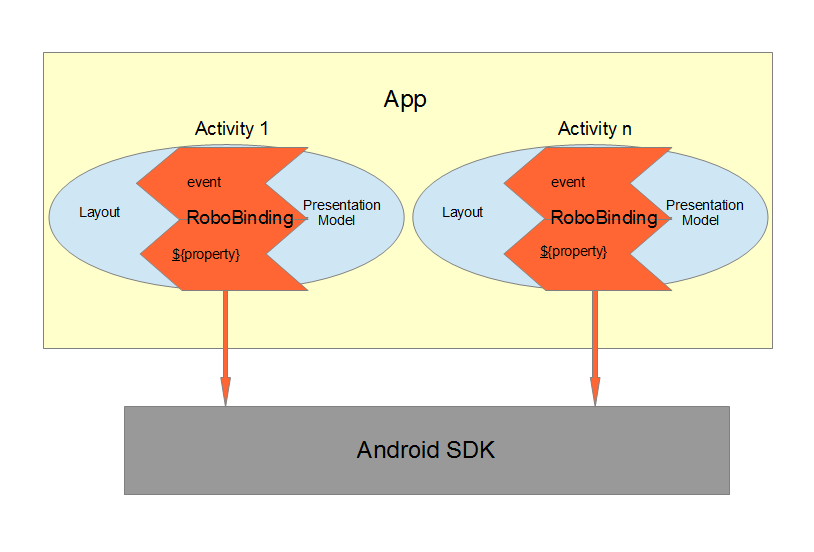
An Android application contains several Activities and other elements. In a RoboBinding-based Android application, an Activity contains an Activity class, a layout xml and a PresentationModel pojo (Whereas in an ordinary Android application, an Activity contains only an Activity class and a layout xml). The display logic, which was originally sit inside the Activity class, is extracted into a separate PresentationModel pojo. Activities will utilize RoboBinding to bind layouts to their corresponding display logic PresentationModels. The display data of a layout is bound to the properties of a PresentationModel, while the view events of a layout are bound to the methods of a PresentationModel. RoboBinding helps to reduce or remove the UI code in original Activity class through simple binding declarations in layout files. Ideally a PresentationModel only contains UI display logic, not UI code or UI wiring code, and can be tested independently and easily.
The sample code for the section is from Robobinding Gallery.
4.1. One-way property binding
When we bind to a property on the presentation model, any changes made to that property are automatically propagated to the view.
activity_view.xml
<TextView
    bind:visibility="{integerVisibility}"/>
ViewPresentationModel.java
public int getIntegerVisibility() {
    return integerVisibilityRotation.value();
}
RoboBinding adheres to the JavaBeans specification whereby to expose properties, we provide public getters and setters.
With one-way binding, only getters are required, as the changes from view are not updated back to presentation models.
For supported UI binding attributes, please refer to API and Binding Attributes JavaDocs.
4.2. Two-way property binding
Two-way binding takes property binding one step further, and ensures that as well as propagating changes from the presentation model to the view, any changes to the view are also synched back to the presentation model.
EditText fields are one of the UI elements that support two-way binding. In this case, whenever a text change is made by the user, the presentation model is updated accordingly.
To use two-way binding, we simply prepend a dollar ($) sign before the curly braces we used in our one-way binding declaration, like so:
activity_edittext.xml
<EditText
    bind:text="${text}"/>
That’s the only thing we have to do. Note that in the case of two-way binding, we would need to have given RoboBinding write-access to the property, so supplying a setter method on our presentation model is compulsory.
org.robobinding.gallery.presentationmodel.EditTextPresentationModel.java
@PresentationModel
public class EditTextPresentationModel {
    private String text;

    public String getText() {
        return text;
    }

    public void setText(String text) {
        this.text = text;
    }
}
4.3. Event handling
Bind view events to presentation model methods.
activity_gallery.xml
<Button
    bind:onClick="showDemo"/>
org.robobinding.gallery.presentationmodel.GalleryPresentationModel.java
@PresentationModel
public class GalleryPresentationModel
{
    ...
    public void showDemo()
    {
        ...
    }
}
When the onClick event is fired, showDemo() method will be invoked. We can optionally supply an event parameter. It will be a org.robobinding.widget.view.ClickEvent in this case.
For supported UI events, please refer to API and Binding Attributes JavaDocs.
4.4. Binding with AdapterViews
When binding with AdapterViews, RoboBinding first requires you to expose the underlying data from your presentation model.
This can be in the form of an Array, List or org.robobinding.itempresentationmodel.TypedCursor.
As well as providing the data, RoboBinding needs to know the type of presentation model each child view of the AdapterView should bind onto. We declare this in our code with the @ItemPresentationModel annotation.
activity_adapter_view.xml
<ListView
    bind:itemLayout="@android:layout/simple_list_item_1"
    bind:itemMapping="[text1.text:{value}]"
    bind:source="{dynamicStrings}"/>
org.robobinding.gallery.presentationmodel.AdapterViewPresentationModel.java
@PresentationModel
public class AdapterViewPresentationModel
{
    ...
    @ItemPresentationModel(value=StringItemPresentationModel.class)
    public List<String> getDynamicStrings()
    {
        return getSelectedSource().getSample();
    }
The class we use for our item presentation model will need to implement the ItemPresentationModel interface, parameterized to the type of data we are displaying at each index.
org.robobinding.gallery.presentationmodel.StringItemPresentationModel.java
public class StringItemPresentationModel implements ItemPresentationModel<String>
{
    private String value;

    @Override
    public void updateData(int index, String bean)
    {
        value = bean;
    }

    public String getValue()
    {
        return value;
    }
}
We can then define a layout xml that will provide the view for each row in our AdapterView.
In the example, we use the Android predefined item layout simple_list_item_1.xml.
Through bind:itemMapping="[text1.text:{value}]", we map text1.text from simple_list_item_1.xml to StringItemPresentationModel.value.
There is a factoryMethod property in @ItemPresentationModel. When ItemPresentationModels have some external dependencies,
we can add a factoryMethod to PresentationModel so that ItemPresentatonModels are created through the method.
In this way, can can pass any dependencies into ItemPresentatonModels and configure them freely. A simple example is as follows.
@PresentationModel
public class PresentationModelSample
{
    ...
    @ItemPresentationModel(value=ItemPresentationModelSample.class, factoryMethod="createItemPresentationModelSample")
    public List<String> getDynamicStrings()
    {
        return getSelectedSource().getSample();
    }

    public ItemPresentationModelSample createItemPresentationModelSample() {
        return ItemPresentationModelSample(dependency1, dependency2, ...);
    }
4.5. Featherweight relational cursor to object cursor mapping
In Binding with AdapterViews, we mentioned a data source type - org.robobinding.itempresentationmodel.TypedCursor.
As we are so used to operating objects over relational data and want to isolate the code that involves relational database operations, RoboBinding added a featherweight object Cursor - TypedCursor.
Through org.robobinding.itempresentationmodel.RowMapper<T>, we translate a row of relational data into an object.
org.robobinding.gallery.presentationmodel.TypedCursorPresentationModel.java
@PresentationModel
public class TypedCursorPresentationModel {
    ...
    @ItemPresentationModel(value=ProductItemPresentationModel.class)
    public TypedCursor<Product> getProducts() {
        return allProductsQuery.execute(db);
    }
}
org.robobinding.gallery.model.typedcursor.GetAllQuery.java
public class GetAllQuery<T>
{
    private String tableName;
    private final RowMapper<T> rowMapper;

    public GetAllQuery(String tableName, RowMapper<T> rowMapper)
    {
        ...
        this.tableName = tableName;
        this.rowMapper = rowMapper;
    }

    public TypedCursor<T> execute(SQLiteDatabase db)
    {
        Cursor cursor = db.query(
                tableName,
                null,
                null,
                null,
                null,
                null,
                BaseColumns._ID+" ASC");
        return new TypedCursorAdapter<T>(cursor, rowMapper);
    }
}
org.robobinding.gallery.model.typedcursor.ProductRowMapper.java
public class ProductRowMapper implements RowMapper<Product> {

    @Override
    public Product mapRow(Cursor cursor) {
        String name = cursor.getString(cursor.getColumnIndex(ProductTable.NAME));
        String description = cursor.getString(cursor.getColumnIndex(ProductTable.DESCRIPTION));
        return new Product(name, description);
    }

}
4.6. Menu Binding
Bind menu resources in res/menu to Presentation Models. Let us have a look at a simple example below.
res/menu/context_menu.xml
<menu xmlns:android="http://schemas.android.com/apk/res/android"
    xmlns:bind="http://robobinding.org/android"
    xmlns:app="http://schemas.android.com/apk/res-auto">
    <item android:title="Delete Product"
          bind:onMenuItemClick="deleteProduct"
          android:id="@+id/deleteProduct"
          app:showAsAction="always"/>

</menu>
org.robobinding.gallery.presentationmodel.ContextMenuPresentationModel.java
@PresentationModel
public class ContextMenuPresentationModel {
    ...
    public void deleteProduct(MenuItem menuItem) {
        ...
    }
}
4.7. Presentation Models
We annotate each PresentationModel with @org.robobinding.annotation.PresentationModel. When a org.robobinding.presentationmodel.PresentationModelChangeSupport is needed in a PresentationModel, the PresentationModel has to implement org.robobinding.presentationmodel.HasPresentationModelChangeSupport interface, so that the framework can use the same PresentationModelChangeSupport instance internally.
There are two ways to implement a Presentation Model, namely with AspectJ and without AspectJ. Below is the comparison.
4.7.1. Without AspectJ
-
Use robobinding-[version].jar or robobinding-[version]-with-dependencies.jar
-
The advantage is that there is no extra dependency on AspectJ, which keeps the final apk relatively small.
-
The disadvantage is we need to type every firePropertyChange("propertyName") manually.
AndroidMVVM and Android-CleanArchitecture are the examples without AspectJ.
4.7.2. With AspectJ
-
Use robobinding-[version]-with-aop.jar or robobinding-[version]-with-aop-and-dependencies.jar
-
The advantage is that many firePropertyChange("propertyName") are auto-generated.
-
The disadvantage is that there is a dependency on AspectJ Runtime Library, which slightly increases the size of the final apk.
Album Sample and Gallery are the examples with AspectJ.
5. Create own view binding implementation
The sample code for the section is from Robobinding Gallery.
5.1. Simple one-way binding attributes
We add enabled attribute binding for Android.View for example - source code.
@ViewBinding(simpleOneWayProperties = {"enabled"})
public class ViewBindingForView extends CustomViewBinding<View> {
}
Then add it to BinderFactoryBuilder - source code.
new BinderFactoryBuilder()
  .add(new ViewBindingForView().extend(View.class))
  .build();
RoboBinding will generate the following for us.
public class ViewBindingForView$$VB implements ViewBinding<View>{
    final ViewBindingForView customViewBinding;

    public ViewBindingForView$$VB(ViewBindingForView customViewBinding) {
        this.customViewBinding = customViewBinding;
    }

    @Override
    public void mapBindingAttributes(BindingAttributeMappings<View> mappings) {
        mappings.mapOneWayProperty(ViewBindingForView$$VB.EnabledAttribute.class, "enabled");
        customViewBinding.mapBindingAttributes(mappings);
    }

    public static class EnabledAttribute implements OneWayPropertyViewAttribute<View, Boolean>
    {
        @Override
        public void updateView(View view, Boolean newValue) {
            view.setEnabled(newValue);
        }
    }
}
All bindings are static, which means no performance impact.
5.2. Other types of bindings
Except for simple one-way attribute binding, there are event binding, multi-typed attribute binding, and grouped attribute binding. To implement these bindings, we will extend CustomViewBinding and implement them manually. Take event binding as an example below.
@ViewBinding
public class MyCustomViewBinding extends CustomViewBinding<CustomView> {
  @Override
  public void mapBindingAttributes(BindingAttributeMappings<CustomView> mappings) {
    mappings.mapEvent(OnCustomEventAttribute.class, "onCustomEvent");
  }

  public class OnCustomEventAttribute implements EventViewAttributeForView {
    ...
  }
}
For these bindings, you can always refer to RoboBinding implemenations - source code under widget package.
5.3. Custom component or third-party component
We can create view bindings for any custom components, third-party components or Android widgets to make them easier for use. In RoboBinding, the way to create an view binding implementation is consistent.
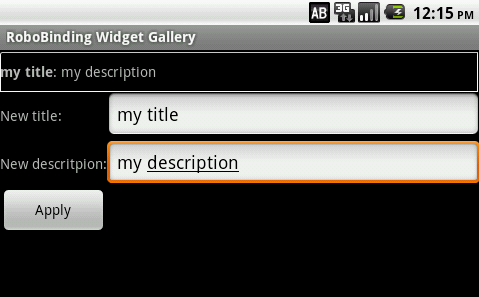
Let us take a simple custom component, the view with white border above, as an example. The component consists of a title and a description. After we input new title and description, and click Apply, the component content will be updated accordingly.
We want the usage can be as simple as follows:
activity_custom_component.xml
<org.robobinding.gallery.model.customcomponent.TitleDescriptionBar
        bind:title="{title}"
        bind:description="{description}"/>
The major part of the source code for TitleDescriptionBar is shown below(for how to implement a custom component, please refer to Android Reference):
public class TitleDescriptionBar extends LinearLayout {
    private TextView title;
    private TextView description;

    public TitleDescriptionBar(Context context, AttributeSet attrs) {
        this(context, attrs, R.layout.title_description_bar);
    }

    protected TitleDescriptionBar(Context context, AttributeSet attrs, int layoutId) {
        super(context, attrs);

        LayoutInflater inflater = (LayoutInflater) context.getSystemService(Context.LAYOUT_INFLATER_SERVICE);
        inflater.inflate(layoutId, this);
        title = (TextView) findViewById(R.id.title);
        description = (TextView) findViewById(R.id.description);
        ...
    }

    public void setTitle(CharSequence titleText) {
        title.setText(titleText);
    }

    public void setDescription(CharSequence descriptionText) {
        description.setText(descriptionText);
    }
}
Its layout title_description_bar.xml:
<merge xmlns:android="http://schemas.android.com/apk/res/android"
    xmlns:bind="http://robobinding.org/android">
    <TextView android:id="@+id/title"/>
    <TextView android:text=": "/>
    <TextView android:id="@+id/description"/>
5.3.1. Implementing the binding attributes
The component has two simple one-way attribute bindings - source code.
@ViewBinding(simpleOneWayProperties = {"title", "description"})
public class TitleDescriptionBarBinding extends CustomViewBinding<TitleDescriptionBar> {
}
5.3.2. Registering ViewBindings
ViewBindings can be registered through org.robobinding.binder.BinderFactoryBuilder - source code.
BinderFactory binderFactory = new BinderFactoryBuilder()
  .add(new TitleDescriptionBarBinding().forView(TitleDescriptionBar.class))
  .build();
It is done. We can create view binding implementations for any third-party components or Android widgets in the same approach.
5.4. Replace an existing view binding implemenation
When an existing view binding implementation does not satisfy our requirement, we can register to replace the default implementations from the framework.
BinderFactory binderFactory = new BinderFactoryBuilder()
  .add(new MyViewBindingForView().forView(View.class))
  .build();

@ViewBinding
static class MyViewBindingForView extends CustomViewBinding<View> {
  ...
}
5.4.1. Extend an existing view binding
Extend the existing TextViewBinding and add the attribute binding for typeface.
BinderFactory binderFactory = new BinderFactoryBuilder()
  .add(new MyTextViewBinding().extend(TextView.class))
  .build();

@ViewBinding(simpleOneWayProperties={"typeface"})
static class MyTextViewBinding extends CustomViewBinding<TextView> {
  ...
}
6. A Walk through Album Sample
Album Sample project is a translated version of Martin Fowler’s original one. The source code can be found here.
In the following section, a package start with . is a relative path to org.robobinding.albumsample.
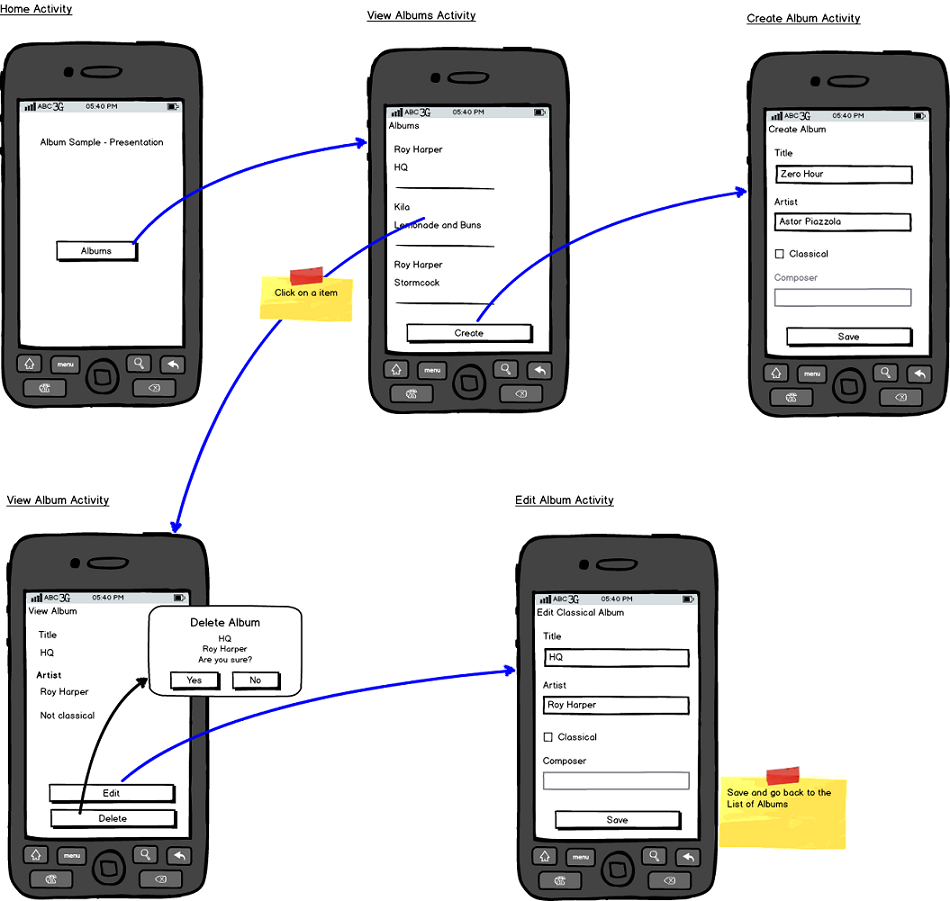
The above is the prototype of the project. The project follows the standard RoboBinding project structure, an Activity comprising of an Activity class, layout xml and presentation model pojo. Inside the project, you can see the following packages: org.robobinding.albumsample.activity, which contains all Activity classes; org.robobinding.albumsample.presentationmodel, which contains all presentation models; org.robobinding.albumsample.model, which contains a Album entity implementation; and org.robobinding.albumsample.store, which contains a AlbumStore implementation based on memory. In the prototype, there are five diagrams, which are described separately below.
The diagram [Home Activity] consists of .activity.HomeActivity, home_activity.xml and .presentationmodel.HomePresentationModel.
The diagram [View Albums Activity] consists of .activity.ViewAlbumsActivity, view_albums_activity.xml and .presentationmodel.ViewAlbumsPresentationModel; and the view of each album item is backed by .presentationmodel.AlbumItemPresentationModel and album_row.xml; when the album list is empty, albums_empty_view.xml is applied.
The diagram [Create Album Activity] and [Edit Album Activity] share the same components of .activity.CreateEditAlbumActivity, create_edit_album_activity.xml and .presentationmodel.CreateEditAlbumPresentationModel.
The diagram [View Album Activity] consists of .activity.ViewAlbumActivity, view_album_activity.xml and .presentationmodel.ViewAlbumPresentationModel; and its album deletion dialog is backed by .activity.DeleteAlbumDialog, delete_album_dialog.xml and .presentationmodel.DeleteAlbumDialogPresentationModel.
Take [View Albums Activity] as an example to give a brief explanation on source code.
The only thing the Activity class, ViewAlbumsActivity, does is to link the Layout view_albums_activity.xml and ViewAlbumsPresentationModel together.
view_albums_activity.xml contains three sub-views a TextView, a ListView and a Button. The TextView does not contain any binding information.
In the ListView, bind:source="{albums}" binds to ViewAlbumsPresentationModel.albums dataset property.
bind:onItemClick="viewAlbum" binds to ViewAlbumsPresentationModel.viewAlbum(ItemClickEvent) method. When an album item is clicked, the method will be invoked.
bind:emptyViewLayout="@layout/albums_empty_view" sets the display when the album list is empty.
bind:itemLayout="@layout/album_row" sets album item row layout, which will be bound to an ItemPresentationModel,
as indicated by the annotation, @ItemPresentationModel(AlbumItemPresentationModel.class), on top of the ViewAlbumsPresentationModel.albums property.
Inside the row layout file album_row.xml, there are two simple TextViews. Their bind:text="{title}" and bind:text="{artist}" bind to AlbumItemPresentationModel.title/artist respectively.
The last sub-view in view_albums_activity.xml is a Button. Its bind:onClick="createAlbum" binds to ViewAlbumsPresentationModel.createAlbum() method.
7. Contents of Gallery Demos
The entry classes mentioned below are from the package org.robobinding.gallery.activity of Robobinding Gallery project.
-
Binding attributes demo for View. The entry class is ViewActivity.
-
Binding attributes demo for EditText. The entry class is EditTextActivity.
-
Binding attributes demo for AdapterView. The entry class is AdapterViewActivity.
-
Binding attributes demo for ListView. The entry class is ListViewActivity.
-
Binding attributes demo for RecyclerView. The entry class is RecyclerViewActivity.
-
Binding attributes demo for Custom Components. The entry class is CustomComponentActivity.
-
Demo for Object Cursor. The entry class is TypedCursorActivity.
-
Demo for Fragment & ViewPager Binding. The entry class is ListFragmentDemoActivity.
-
Demo for Options Menu Binding. The entry class is OptionsMenuActivity.
-
Demo for Context Menu Binding. The entry class is ContextMenuDemoActivity.
-
Demo for Contextual Action Mode Binding. The entry class is ContextualActionModeActivity.
8. Project structure and best practices
Involved from MVC pattern, the major motive of Presentation Model(MVVM) pattern is to further decouple UI state and logic into a pure POJO Presentation Model, which can be easily Unit tested. Meanwhile, the dependency of View→Presentation Model→Model becomes unidirectional. When applying the pattern, these are the basic rules we will follow. Album Sample is an example that follows the best practices. Recommend to read Martin Fowler’s original article on Presentation Model.
8.1. Overall project structure
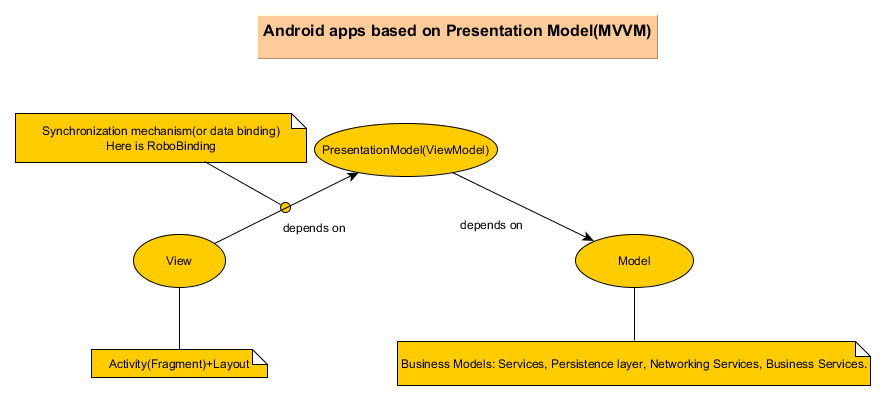
In Android app, the view layer consists of activities(fragments) and their layouts and the model layer(or business model layer) consists of various services, persistence layer, networking services, business services and so on. The diagram indicates the dependency between different layers. The view layer for example never directly accesses the business model.
8.2. The solutions for some common design issues
-
When we are not using a third-party dependency injection lib, we may instantiate business model objects in Activities and then pass them into presentation models, but the view layer(or any activities) will not directly access any business model objects.
-
Sometimes presentation models may need to call some functionalities in the view layer. We can add view interfaces in between to decouple the relationship. Presentation models depends on view interfaces instead of the view layer, which keeps the testability of presentation models. If you prefer, you can shift these view interfaces into presentation model layer or presentation model package, so that the dependency remains unidirectional. Let us have a look a simple example below:
interface MainView {
    void doSomeViewLogic();
}

class MainActivity extends Activity implements MainView {
    ...
    @Override
    protected void onCreate(Bundle savedInstanceState) {
        ...
        PresentationModel presentationModel = new PresentationModel(this);
        ...
    }

    public void doSomeViewLogic() {
        ...
    }
}

class PresentationModel {
    private MainView mainView;

    public PresentationModel(MainView mainView) {
        this.mainView = mainView;
    }

    public void someEvent() {
        mainView.doSomeViewLogic();
    }
}
9. Other resources
Feb 2012 A video of a talk on RoboBinding at SkillsMatter, London can be found here.
Jul 2014 A video of a talk on RoboBinding in Chinese by Cheng Wei can be found here.
Sep 2014 A talk at YOW 2014 Android MVVM by Adil Mughal on Write cleaner, maintainable and testable code in Android using MVVM.
AndroidMVVM A minimal android app with MVVM.
RoboBinding album sample is an Android translation of Martin Fowler’s original sample code on Presentation Model pattern.
RoboBinding Gallery demonstrates RoboBinding features.